Bow ties are cool.

The Doctor said it. We agree. Whether you're looking for an easy, cheap, DIY party favor or an adorable addition to your wardrobe, look no further! These felt bow ties can be made faster than you can say Albus Percival Wulfric Brian Dumbledore.

What you need:

Felt

Hot glue gun

Glue sticks

Scissors

Barrettes and/or clips and/or headbands

Leftover Halloween candy

What to do:

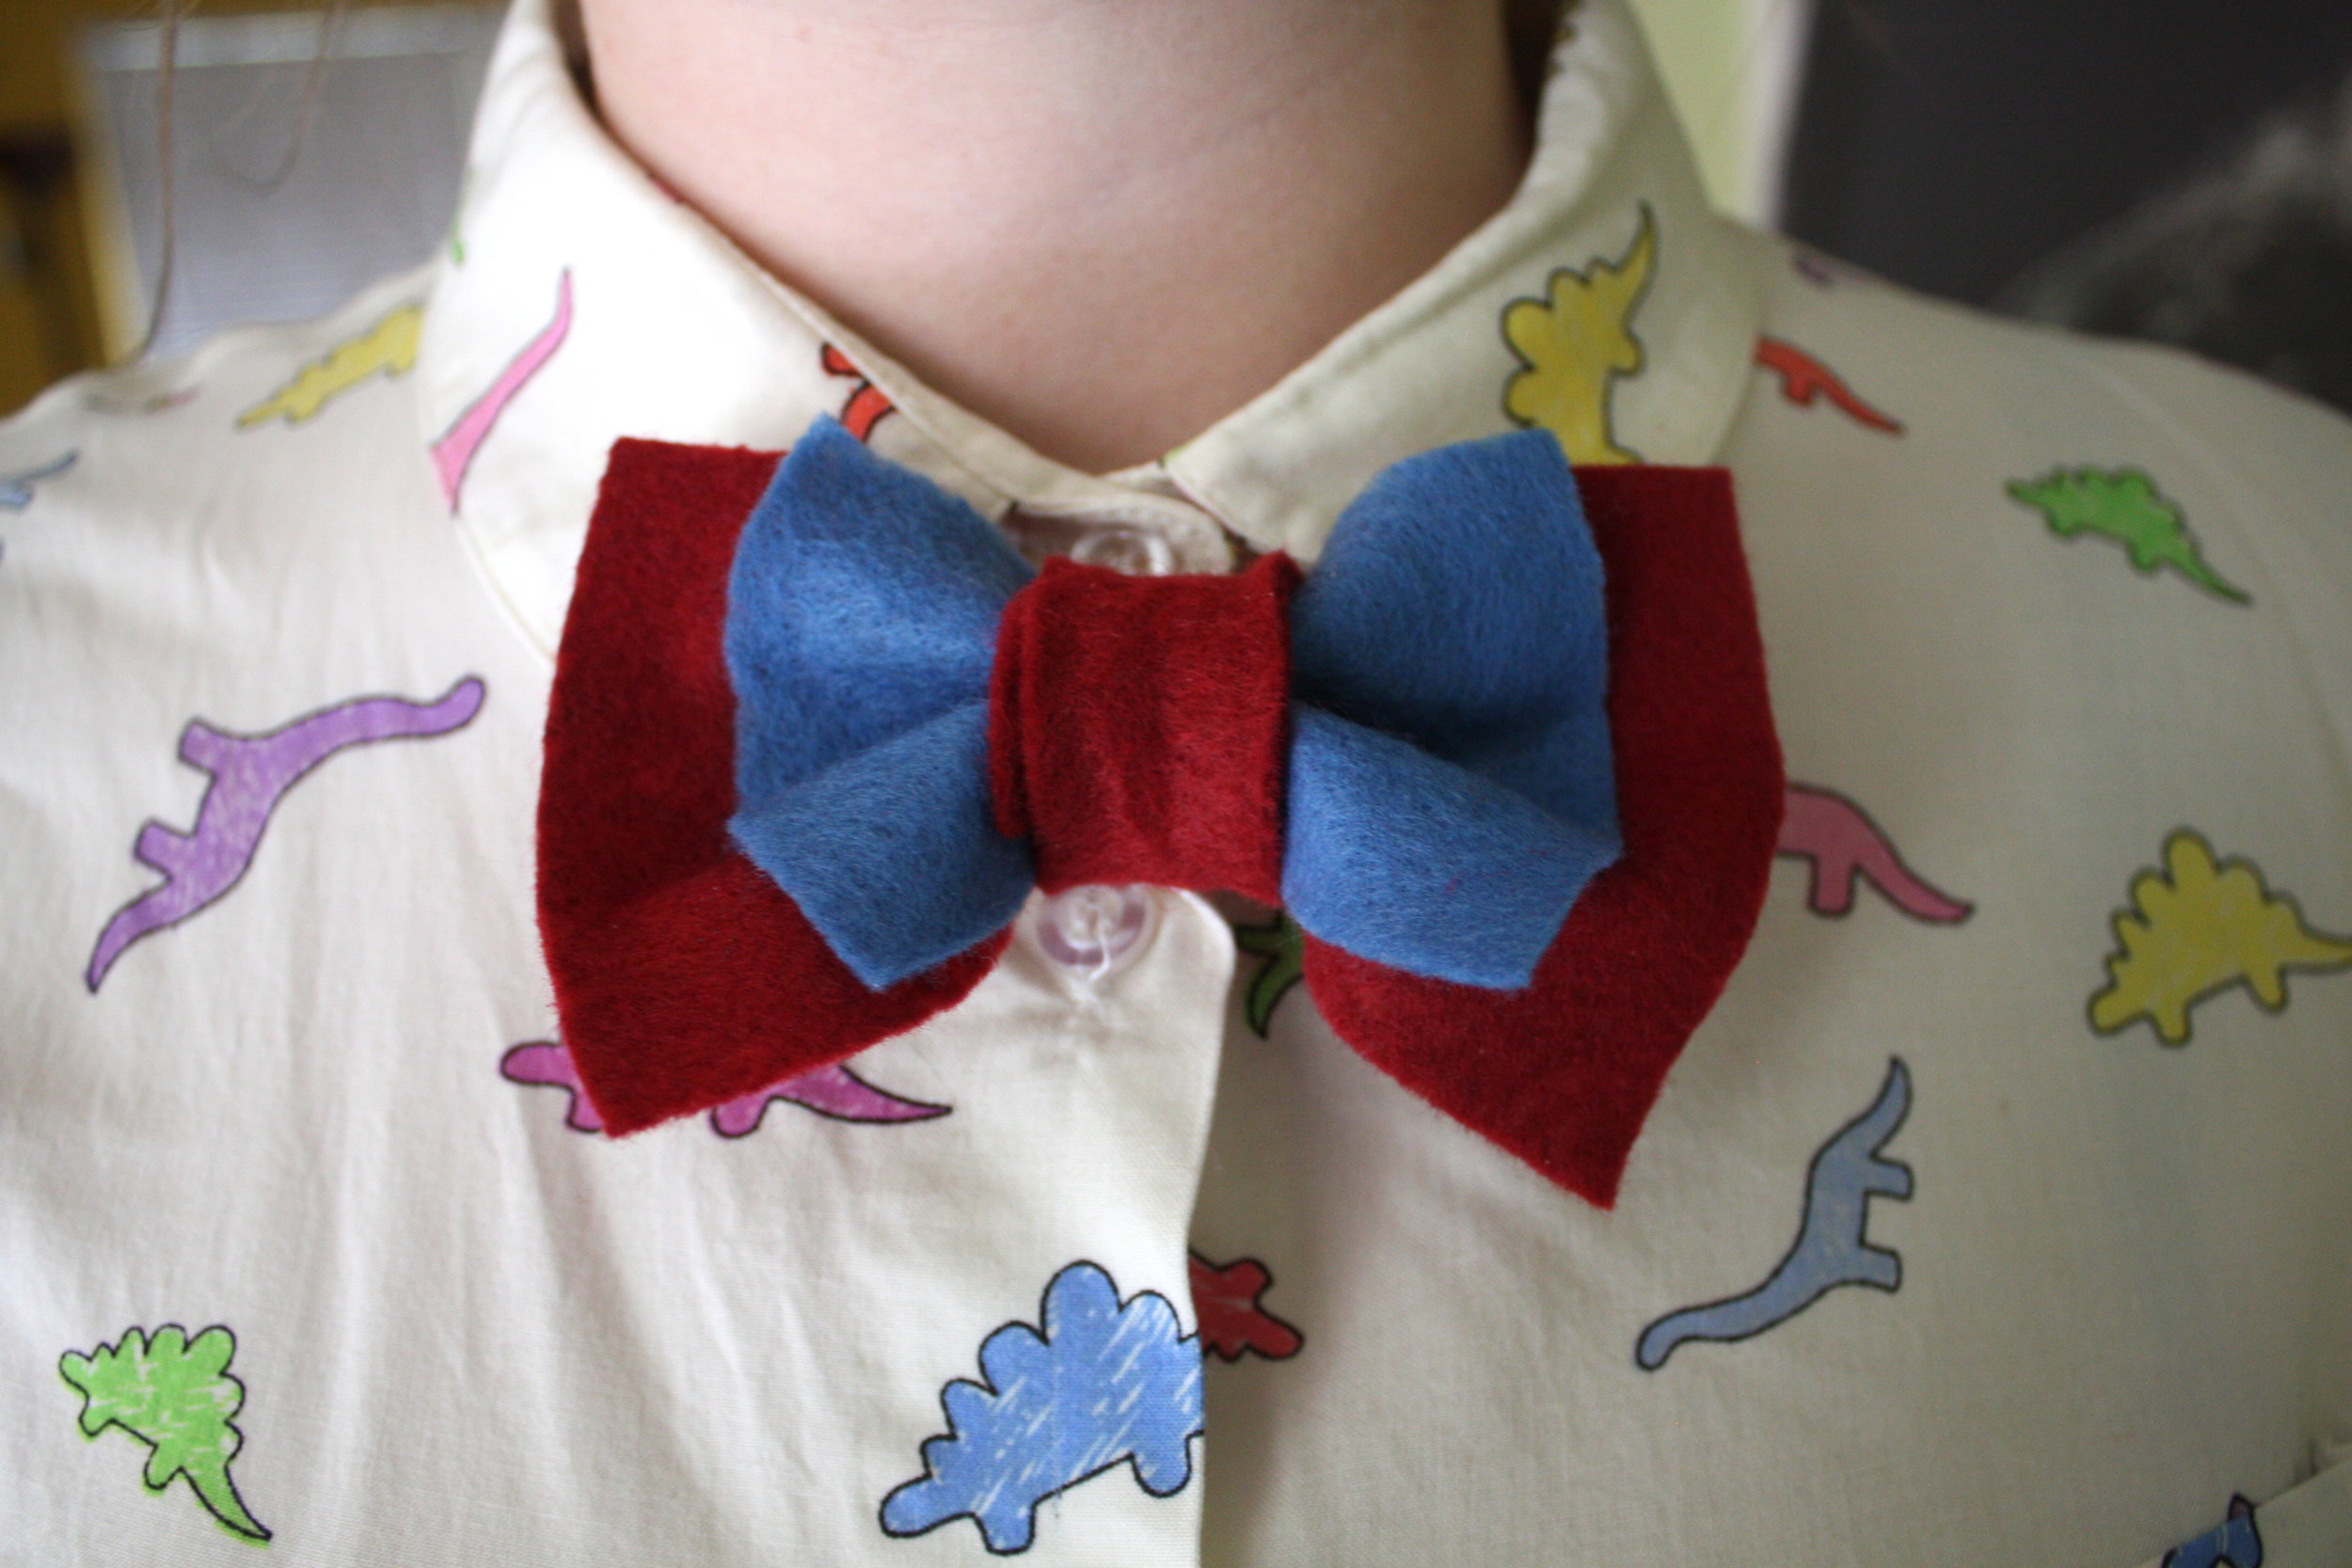
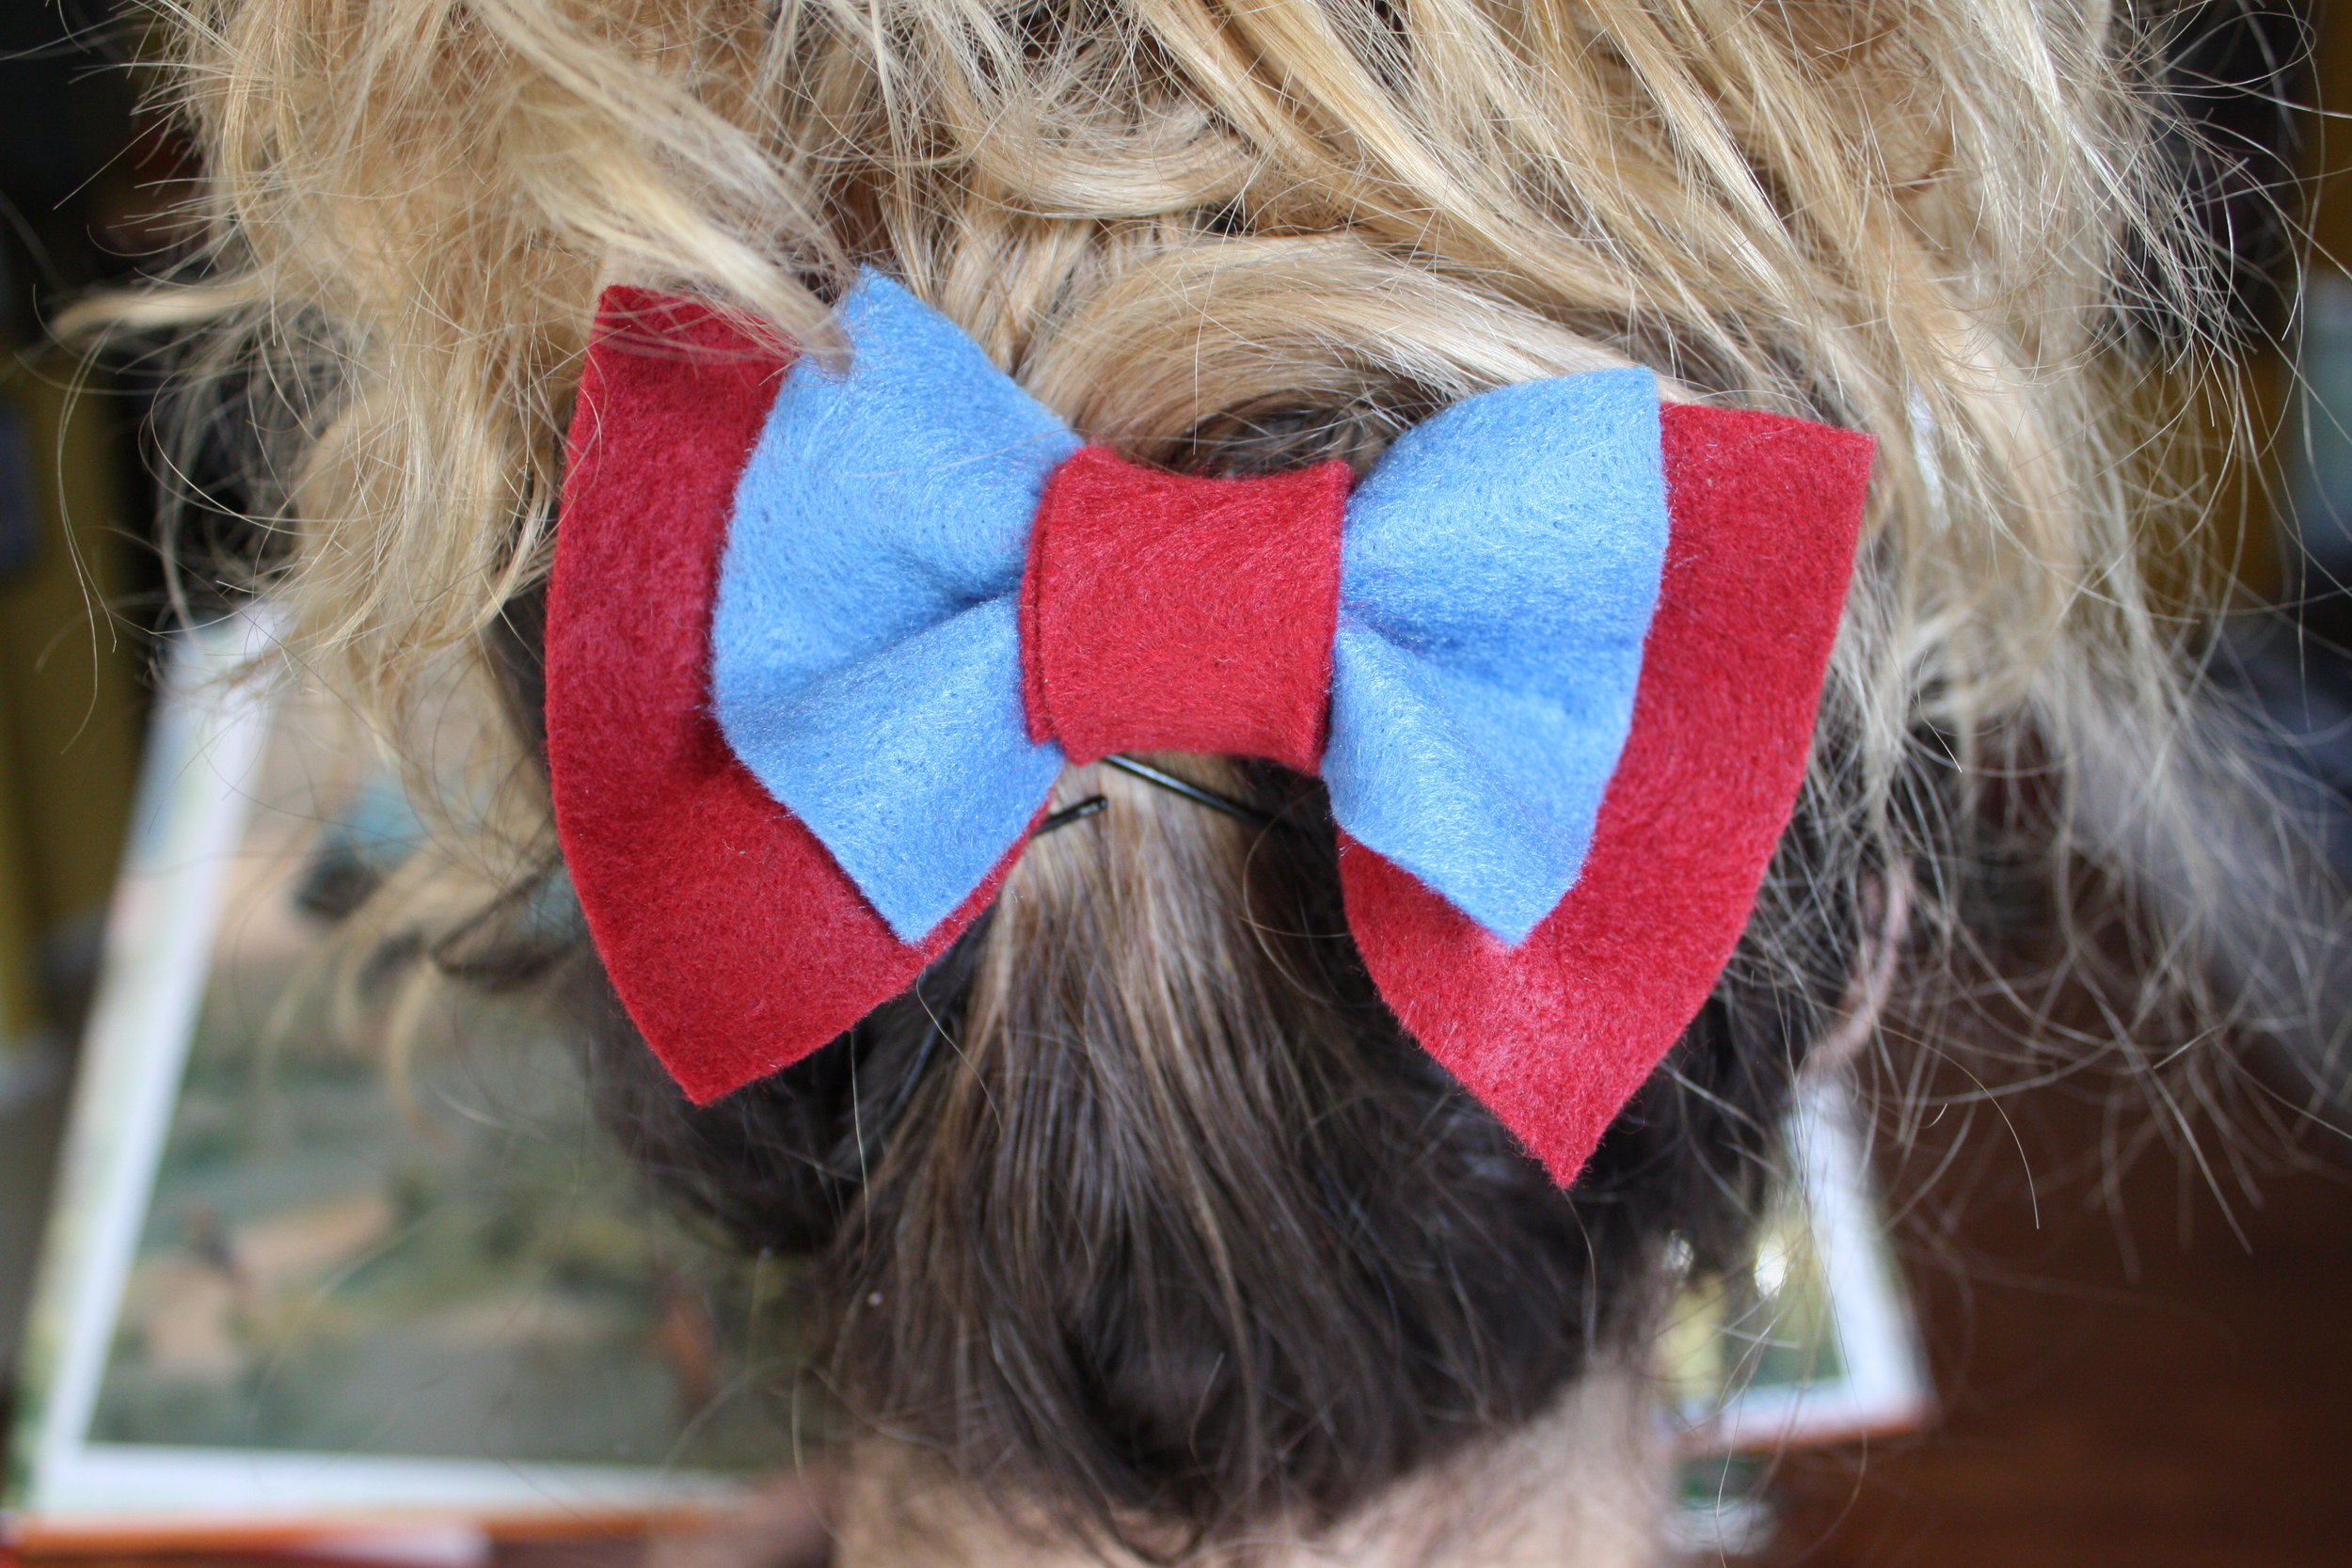
If you're doing two-color bow ties like we did, you'll have the larger piece in one color, the smaller piece in the second color, and then the middle wrap-around-thingy piece in the same color as the larger piece.  

As for the size of the pieces:

For the larger piece (maroon in our example), we cut a piece of felt into two hot dogs, then cut each of those hot dogs into 4 hamburgers.

For the smaller piece (blue in our example), we cut a piece of felt into three hot dogs, then cut each of those hot dogs into 4 hamburgers.  

For the middle wrap-around-thingy, we took one of the maroon hamburgers and cut it into three tiny hot dogs.

Now to make your bow tie feast, put a blue hamburger on top of a maroon hamburger, and scrunch in the middle like a baby accordion. Take your maroon hot dog and wrap it around the middle, making sure that the end winds up on the back. Use hot glue to secure.

While glue is drying, eat some Halloween candy. It'll keep you from touching the glue too soon to check if it's dry and burning your hand.

Now decide which type of accessory you want! If you want it as a clip-on bow-tie, hot glue a clip to the back.

If you want it for your hair, hot glue the bow tie to a barrette or head band.

While glue is drying, eat some more Halloween candy.

You ate too much Halloween candy. Put the candy away.  

For today's example, we used the Ilvermorny colors to have cute accessories for the Fantastic Beasts premiere next week! Also shown below are Hogwarts House-colored bow ties we made for a Harry Potter party we threw last year. A cute way to sort your guests into "Houses" is to have them draw their bow tie.

And voila! With your new bow ties, you'll look as cool as the Doctor and as wise as a wizard. Win win win.

You're an independent witch that don't need no Ollivander.

Whether you're throwing a child's birthday party, an adult's birthday party, or just having a typical night in, you're going to need some wands.  Rather than being born into a life of witchcraft and wizardry, traveling to England, finding someone that knows the entrance to Diagon Alley, making your way to Ollivander's, and having the wand choose you, take matters into your own hands and just make one.  

What you'll need:

Chopsticks

Chinese food

Hot glue gun

Glue sticks for said hot glue gun

Acrylic paint

Paintbrushes

What to do:

Once your hot glue gun has had time to heat up, take one of your chopsticks and start squeezing the hot glue around the end of it. We recommend spinning the chopstick slowly as you squeeze out the glue as it will keep the glue from dripping.  

You can encircle the last few inches of the chopstick if you want a wand with a handle, or you can do any number of designs with the glue along the chopstick should you feel so inspired.  

Once the glue starts to cool a bit, it becomes semi-malleable so you can work with its shape to your liking. After the glue has fully dried (which doesn't take more than a minute or two), you are ready to paint!  


Use browns and maroons with some gold accents if you want something more earthy. Use pinks and purples and glitters if you're a princess witch. Wait for a full moon if you're patient and think it might help. While you wait for the paint to dry, use your leftover chopsticks to eat some lo mein and ponder the ways in which you might incorporate your wand into your everyday life (hint: there are literally a million ways). 


Once the paint has dried, make some magic duh.


Homemade Bath (da) Bombs

We like baths and we like things that smell good and we like pretty things and we like not spending a ton of money.  

Cue these DIY Bath Bombs!

There are a million different recipes with a million different instructions on Pinterest on how to make these.  Let us impart our knowledge on to you based on what we've learned in our quest to make good-smelling, pretty, cheap, bath-time things.

Ingredients

1 cup baking soda

1/2 cup citric acid

1/2 cup Epsom salts

1 tsp. water

2 tsp. essential oils

3 tsp. olive oil

food coloring

bath bomb mold

1 bottle red wine

straws

masking tape

What to do:

Mix the baking soda, epsom salts, and citric acid together in a large bowl.  Mix the essential oils, olive oil, and water in a separate container.  We wanted to use two different colors, so we separated the dry mixture and wet mixture into two bowls each (4 total). Add food coloring to your wet mixture(s).  The more drops you use, the darker the color is going to be.  Then add this wet color mixture to your dry ingredients spoonfuls at a time.  Whisk the dry mixture thoroughly as you're adding the wet mixture.  Drink red wine through straw as your hands will be busy whisking/spooning.  

Once you have your dry and wet ingredients mixed in two separate bowls (or 3 or 4 depending how rainbow-tastic you want these bath bombs), take your bath bomb molds and fill them.  

TIP ON FINDING BATH BOMB MOLDS

Do not let Hobby Lobby tell you they don't have them.  We used these clear plastic ornament-maker things that are very easy to miss and you may walk past them twelve times before realizing they are there.  Keep asking employees where they are until you find one that knows what's up.  They do have them.  

We layered the mixtures in fun ways.  We even got some flowers and sprinkled petals in the plastic mold before filling them.  Once both sides of the bath bomb mold/ornament maker are filled, join them together.  This should make about two bath bombs depending how large of an ornament-maker you get.  

What not to do:

DO NOT over-fill either side.  In fact, leave a little space on both halves.  THIS MIXTURE EXPANDS. Like…really expands.  It expands big.  And then it keeps expanding.  One might even say these bombs like to…explode.  Once both sides are conjoined, use your masking tape to wrap it and wrap it good.  It may act like it wants to come apart.  Don't let it.  

TIP ON HOW TO KEEP YOUR FILLED BATH BOMB MOLDS FROM ROLLING AWAY

Make a nest for your new baby mold.  We used a bowl with a towel inside to keep our ever-expanding (and expanding and expanding) bomb from fleeing.


Let these babies dry overnight.  Once 24 hours have passed, they are ready to be used.  It may be hard to open the mold, but when you do, it's worth it.  

TIP ON OPENING MOLDS

Twist, don't pull.


We will definitely make these bath bombs again.  They create a delicious bath time environment, and make you smell like a kween.  Plus your inner 9-year-old will love watching them fizzle when you first put them in the water.